Saturday, December 8, 2012

Mischievous

Little boys, by nature, can be mischievous, right? When they are together, and quiet, there is something up.  Or when they are together, and giggling uncontrolabl, something is up. The latter is what I walked into last night, they were sledding off their beds. It involved the top of their toy bin, lots of cushions and some muscle to push each other off the bed and slide to the floor. 


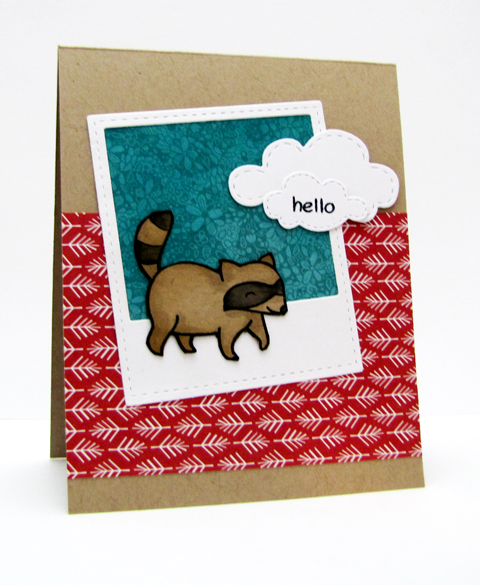
Last year, Amy T. posted about a sweet little boy that was in need of some cards before his big surgery. I sent one to him and it felt good. I needed some "feeling good" today so I made a card to send this year as well, as Sebastian is heading for another surgery shortly. You can find out all about Sebastian and his journey on Amy's blog.  I chose to use a raccoon image because I think they are mischievous and wild just like my boys are, and I think Sebastian is too! 

The colors came from the current Lawnscaping Challenge. Always fun to play along with them and have a reason to ink up some Lawn Fawn Stamps. I thought I was being clever by choosing the red tree patterned paper from Lawn Fawn's Fa-la-la Collection and using it on a non-holiday card. The blue patterned paper, shaded with distress inks, is from the Bright Side Collection. The stitched photo frame and clouds are products from Lil' Inkers.

The sketch is from Retro Sketches. I did a mirror image of my sketch because that was the direction the raccoon was facing.


Friday, December 7, 2012

Swanky Ribbon Trees

***My CAS-ual Fridays post is just below, please scroll down or click here to see!***


The May Arts Ribbonistas have an inspiration parade up over on the May Arts Blog featuring all things Christmas Trees! I decided to go for the unconventional and be glamorous this holiday season by decorating in lime green, fuschia and black. It makes a stunning impact when paired with silver. I've created some swanky holiday Christmas Tree decor as a centerpiece for my table or mantlepiece using May Arts Silk Ribbon in Lime Green, Fuschia and Black...and for that little extra bling, May Arts Wired Beads in silver.


1. The process was really simple, and it only took a few supplies to make three trees. Trim a piece of card stock in a square and cut to form a cone shape. The size of your square depends on how tall your tree is. I just free handed my cut, but you could use a compass or circle cutter too.
2. I covered the cone with adhesive, running both length and width, then formed the cone shape by securing the two edges together with strong double sided adhesive.
3. I started running a length of ribbon from the bottom to the top of the cone in a real messy like fashion, but being careful to cover the card stock completely with ribbon. I didn't pre-cut the ribbon, just kept it on the spool until I covered the cone completely.
4. To finish the process of the wrapping, I secured the ribbon to the cone with a strong adhesive tab and tucked in the edges. The silk ribbon is such a nice fiber to work with because it is very wide, at 1.25 inches, forgiving, pliable and has a nice sheen to it.
I made three trees of varying sizes to form a nice visual centerpiece. The colors I chose were Lime Green (SK08), Fuschia (SK22) and Black (SK10). For added interest-and glam!- I wrapped each tree with a length of May Arts Wired Beads in Silver.


You won't want to miss stopping by the May Arts Blog to see all the inspiration and links, I even heard that there is a prize up for grabs (3 spools of ribbon!) for leaving a comment!

Thursday, December 6, 2012

Red Arrow Brigade


She wears the Red Arrow lapel pin every day in support of the the troops, no matter if her dress shirt has a lapel or not. In the past six years that I've worked with her, she's switched out the red arrow for a yellow ribbon. And she'll switch it out again as her son makes his fourth journey overseas to continue to fight for our country... The Red Arrow Brigade was notified on September 11th (of all days) that they will be deployed within the next few months.


A new challenge is up at CAS-ual Fridays: Knotty or Nice!-create a project featuring a knot. The sponsor is the fabulous Simon Says Stamps and not only is there a gift certificate involved but this is also a Guest Designer Challenge! You can read more on this week's challenge, prize information and rules, as well as see the great knotty inspiration from the Girl Fridays on the CAS-ual Fridays Blog.

My card today features a piece of yellow May Arts Silk Ribbon knotted around a twig, a representation of the yellow ribbons tied around trees that currently had lined the streets in our town not too long ago. The sentiment is one from CAS-ual Fridays Stamps Calm and Gentle stamp set. I'll be giving the gal at work a gift of a few cards to send overseas, and this one will fit in nicely with the others.

Can't wait to see your Knotty or Nice creations!

Wednesday, December 5, 2012

Deer Kisses


My dear husband and I were married three days before Christmas quite a few years ago. Such a busy time for people, yet we still had the pleasure to share the day and evening so many loved ones and friends. It was beautiful...there was a light snowfall during the day, the weather was crisp but not the kind that takes your breath away. I kept warm in my dress that my mother made and the shawl my grandmother made and of course, my husband's tuxedo jacket too!


The new December Card Kit from Artful Delight is phenomenal! There is a mix of Christmas and Winter elements...you can check out the contents here. I have a tutorial up on the Artful Delight Blog that showcases multiple uses of a die cut included in the kit, this one right here (varies per kit):


I made the above card with a technique I'm showcasing in the tutorial and then happened to make another card too!


Please stop on over to Artful Delight and while you are there, check out the sketch challenge as well!

I'm entering my card into the Young Crafters Unite Challenge! Really getting into making holiday cards now, so thanks for the inspiration!

Tuesday, December 4, 2012

His Star


Now after Jesus was born in Bethlehem in Judea in the days of Herod the king, magi from the east arrived in Jerusalem, saying, "Where is HE who has been born King of the Jews? For we saw His star in the east, and have come to worship Him." Matthew 2:1-1

There was an announcement over on the Skipping Stones Design's Blog yesterday, did you happen to see it? Heather has decided to take a bit of a break and the design team are featuring their favorite sets for the next few months. One of my all time favorite Skipping Stones Design sets is Wise Men.

I started by creating a deep blue panel with distress inks and shimmer spray. I stamped the lone wise man image onto the bottom portion of the panel and then on the top portion, and then I stamped the star in a white ink and heat embossed it. There was a little too much space to my liking between the two images, so I cut a center piece out and then adhered the two panels to a kraft card base with glue and a thin line of stitching. I finished the card by stamping and heat embossing in black with one of the amazing sentiments in the set.

You won't want to miss choosing this set to make its way to you before they are all gone, and while you are shopping, take advantage of the PMS sale going on too!

Sunday, December 2, 2012

Further & Further


My father-in-law raises homing pigeons. He's got an amazing set up for them and part of their care requires letting them loose to fly. I asked him once how he knew each of the birds would come back, after they flapped their wings and flew, higher and higher, further and further into the sky when there came a point you couldn't see them anymore. He said to just wait and see, they'll come back, it is just what they do. So then slowly, after about a half and hour or so, each bird circled the coop and flew back in, they came home.

This is another entry for the 2013 Winter CHA Contest hosted by Lawn Fawn, using Sunny Skies. I know the birds aren't pigeons, but I was thinking of them as I set out to create the card. I started by stamping the one bird, and then proceeded to stamp the different styled bird in a various directions. They were heat embossed and colored. **The birds were all stamped with white craft ink first, and then heat embossed at the same time.** I highlighted the single bird by paper piecing it in yellow and lifting it's wing slightly with dimensional adhesive.

Saturday, December 1, 2012

Smiley Sun


Can you relate?...You've got a To-Do list a mile long, stacked gifts piled up in the corner, waiting to be wrapped, a mess in your craft room that would make even a teenager jealous....and all that you want to do is create something that isn't on the To-Do List? Yep, that is me today.


I wanted to throw my hat into the awesome 2013 Winter CHA Contest hosted by Lawn Fawn. I chose to work with Sunny Skies, and each and every time I ink it up I love it even more. The above card is a version of this card:


I like them both, they both feature only cardstock, ink and Sunny Skies, but gosh, that cute little smiley face sun with the drawn cheeks does me in...

Friday, November 30, 2012

Mistletoe & Chalk


"I saw Mommy kissing Santa Claus / Underneath the mistletoe last night. / She didn't see me creep / down the stairs to have a peek / She thought I was tucked up in my bedroom fast asleep."


I've got two cards to show you today featuring holiday releases from CAS-ual Fridays Stamps. The first card uses Merry Kiss-Mas. I stamped and embossed the mistletoe image onto a panel of white cardstock and then added a touch of depth with some light yellow sponging in the background. I finished complimenting the image with a few dots of white Enamel Accents. After stamping the a portion of the "merry kiss-mas" sentiment from the set, I adhered the panel to the card base and finished it all off with a big silk bow from May Arts. I was really inspired by this beauty here!

Young Crafters Unite is hosting a Holiday Card Challenge, and since I'm actually going to be sending this one out this year, I thought it would be a perfect fit!
 

The second card is my *first* attempt at the chalk board technique wonderfully shown in Betsy's tutorial here. I chose to work with images from the uber fun and stylish Countdown set from CAS-ual Fridays Stamps.

I stamped and heat embossed one of the many border strips from the set as well a sentiment, then came back and added a shadow with white ink. I then colored in some of the bubbles with colored pencil and finished with the "chalk."

Two super fun holiday sets from CAS-ual Fridays Stamps...two totally different cards.

Thoughts for Addison

***Please scroll down to see my latest CAS-ual Fridays Challenge project!***


Have you arrived from Julie Ranae's blog?! Yes?! Great, then that means you've been following The Craft's Meow November Release Blog Hop! If not, no worries, the complete hop list can be found on The Craft's Meow Blog. First, I'd like to say thank you for words of encouragement left on my blog and The Craft's Meow Blog on Zoom Goes My Heart! I love creating sets that can be used over and over, and ones that fill a void in the market. Thank you!

The Craft's meow

I've got a one layer, clean and simple card today that features two sets from this release, Valentine Wishes and Stitched Sentiments Two (which is November's gift with a $50 purchase!). These are such sweet images and reminded me of a little girl that could use some kind thoughts in the form of cards.


 Please consider sending some cards to Addison! You can find out more details here on Kelly's blog.

I stamped one of the larger girl images from Valentine Wishes onto a pink card base and then colored her with colored pencils, adding some white gel pen highlights to the balloons. Then I stamped the sentiment and connected the dots on the word "thought" so I could color it in. A rounded corner finishes the card off. I hope it will put a smile to Addison's face. I'm entering this card into Moxie Fab World's Keen on Neon Challenge, as the colors were inspired by it.

By participating in today's hop and leaving comments on the design team member's blogs by 9:00 PDT, Sunday, December 2nd, you have a chance to win each of the four sets released this month! Your next stop on the hop is our guest designer, Kim Duran!

Thursday, November 29, 2012

Santa's Magic


In my childhood home we had a fireplace with small terracotta colored tiles for the hearth. I remember being fascinated that some big, chubby man could fit down the dirty chimney, hardly leaving a mark except for the vast amount of gifts and half eaten cookies he left behind. One year, though, he was not so careful...he left sooty boot marks leading up to the tree from the fireplace...Many, many years later at my own house, the same man left a white glove on the end table by the plate of cookies. Oh, the magic of "Santa"!


CAS-ual Fridays has a new challenge up, which is perfect for the approaching holiday: Create clean and simple gift tags! There is fun eye-candy available on the CAS-ual Fridays Blog as each Girl Friday has totally outdone themselves with this challenge, and you can catch up on the challenge details, rules and prize information there too! We have a new sponsor this week! bossy Joscie crafty flair!


My tag features a lightly stamped background and sentiment from the gorgeous Snowflake Greetings stamp set available at CAS-ual Fridays Stamps. The very tired looking Santa is from Lil Inker's Dear Santa Set and the tag is tied with May Arts Silk Ribbon and Twisted Burlap.